by DefendUSx August 07, 2009 00:05
The thing that makes this most believable to me are the dates, no Father signature, and Ann being from "Witchita KS". Only someone with some deep knowledge about the Obama debacle would know enough to make those adjustments. Not only this, but my own research on what everything on the form means from English Common Law, including the "7S 6d" in the upper-left corner, which is British currency.
So, i'm not ready to say it is a fake, and now the most recent pictures displayed on the Internet by the "forgers", in what i believe is an attempt to discredit this as a forgery, only gets me thinking the registered copy Orly has in her possession, is even more possibly the real-deal. If i'm wrong, it would be the first time ; )
The graphics programs today are amazing, especially the "high-end" programs. They can take an image you cut out from another picture, and place that image onto any background (of a different image). From there, you can add other layers to the image -such as text overlay. You can literally make a whole "composite" of images, appear as one solid image, as if it were just one picture. You can "clone" backgrounds and have them "repeat" along a certain grid etc. Many people today don't understand this, or how it is possible, but it certainly is, welcome to the Age of Digital Forgery.
Let's go through each image released by the forgers in attempt to discredit the Kenyan Certification of Live birth photo-copy Orly released the other day. Let me take you on a short tour for the "unbunking" of the most recent forger "debunking" of the certificate. Here is the first image released by the forgers:

You can see a little brown spot that was on Orly's released copy, also appears in exactly the same spot in the certificate above. Look to the right of the word "Mother", and you'll see this brown "blotch'. The folds in the certificate to Orly's image are identical. It's because this image was taken from Orly's photo and "super-imposed" onto this new background with a Typewriter, Coin and copy paper. Oh, and i bet you look hard enough, you can find the same Typewriter image, Coin image, and copy paper image on the Web - that is if they haven't been scrubbed already.
First, we have to find out what graphics program was used to do this. This is easy to do. You take the image above, save it to your hard drive and open the image in a text editor like "Notepad" or "MS-Word", and you'll see the program's signature in what is referred to as the HEX code of the image. When doing this for the image below, low and behold, we get "Lead Technolgies Inc."

It turns out, Lead Technologies has one of the highest-end most functional and capable graphics program only Stimulus money can buy. It supports all kinds of "effects" for warping an image to appear as if it were crumpled paper, to well, you name it. Even cheap graphics programs can skew paper corners in making them appear as if they were "folded" or bent. Lead Technologies graphics software (Lead Tools) is advanced - see for yourself. It even supports high-level programming languages, like the one this site uses. I am a programmer, so can tell you, that having the ability to use high-level programming languages for further customization and graphics manipulation is a huge advantage to creating new effects "algorithms" that may not be initally supported by the software.
From the Lead Technologies site:
"LEADTOOLS gives developers the most comprehensive, flexible and powerful imaging technology available in an imaging toolkit, and includes enough sample code to make your next development project a snap."
Here is the next image:

I don't know what this image is supposed to prove, other than the Typewriter, Coin and copy paper has not been added to the background yet. Notice a similar background is used as the one in Orly's image. It's not the same though, if you look closely, you can tell they are close, yet different.
Here is another image:

Keep in mind, every image (do the steps above to see for yourself), is using the advanced "Lead Tools" graphics manipulation software by Lead Technologies. You can see what appears to be tears and "crinkles' in the image. Also, the text "You've been Punked" has been added as a new layer to the image with the "Marker" drawing tool. Advanced graphics programs like "Lead Tools" can do what you see above. It's all about tricking the eye into adding depth to what actually is still a two-demensional picture. By subtle shading and variant coloring, the graphics program can make any image appear in a different context (usually 3-deminsional) than what it was orginally. The graphics program will even go down to the single "pixel" level. Pixels are the very tiny dots in the image that make up the image. Each pixel had a color, and when those colors are blended, you can cause what appear to be bends, kinks, tears or you name it.

Again, another effect to make it appear as if a paper (the certificate) has been crumpled. Notice the forger included a Typewriter, Coin and copy paper in the image, but does not show how one would forge the "Symbol" at the very top of the certificate. Sure, anyone can get an old Typewriter and forge a paper document, just as anyone can forge an image document (that is supposed to be a paper document, but isn't, as Obama's images are).
So you see, with a high-end graphics program, you can literally add in some "cool" effects to any images, to make them appear real. It's more common than you may think.
And finally, think about this logically. The "brown blotch" gives it all away. If the "forger" created another forgery, and had the "natural brown blob" on it from a spill or in transit, then it would be the only one produced. Because in the third image, you can't mail something that's been that crumpled and have it appear in good shape when Orly got the copy.
Notice too, none of the original text from Orly's image has been changed. Lead Tools may not have a "Typewriter" font, so the forger coveniently left all that out and left the orignal text as is.
Here is how you can create a crumpled paper effect, using a "cheap" graphics program:
Creating Crumpled Paper
1. CREATING TORN EDGES
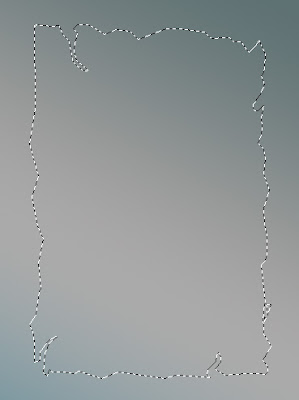
Start by applying a gradient to the background. Create a torn page style selection using polygon lasso tool.

Create a new layer and fill the selection with an off white color.

2. CREATING LINES PATTERN
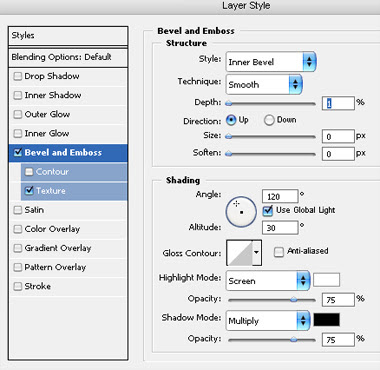
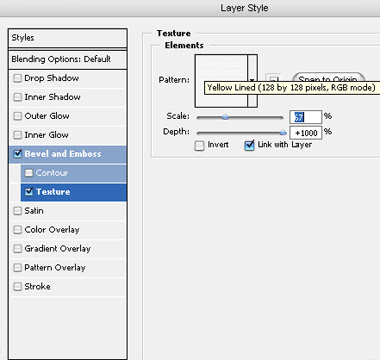
Double click the layer to open layer style window. Apply settings as shown.


3. CREATING CRUMPLED EFFECT
From layer menu select layer style>>create layers. Select and merge all the resulting layers. Double click the layer to open layer style window. Apply settings as shown.
From layer menu select layer style>>create layers. Select and merge all the resulting layers.
Move the second last layer one step above in layer order in layer palette. Select the top most layer. Change the layer mode to “hard mix”, opacity to 50% and fill value to 75%.
Select and merge all the layers. Double click the layer to open layer style window. Apply settings as shown.
Create a few duplicates, rotate and place as shown.
Though i haven't worked with Lead Tools, here are some of what other "cheaper" programs can do.
(crinkled paper effect on the edges - different program than Lead tools though). The last one is a fulled crumpled paper effect.
Here we add a cool "satin" effect on top of the "crumpled paper" effect. Some graphics even allow you to add "crumpled texture" to a background (2nd pic). Notice the third one even adds the jagged ediges that appear as "rips" in the paper.
NOTE: NOT ALL IMAGES COULD BE UPLOADED FOR THIS POST.


 An election for President and Commander in Chief of the Military must strive to be above reproach. Our public institutions must give the public confidence that a presidential candidate has complied with the election process that is prescribed by our Constitution and laws. It is only after a presidential candidate satisfies the rules of such a process that he/she can expect members of the public, regardless of their party affiliations, to give him/her the respect that the Office of President so much deserves.

No comments:
Post a Comment
Note: Only a member of this blog may post a comment.